We installed the new septic system without too many glitches. The next step is to dig the trench for the foundation, line it with rebar, and then have it inspected before pouring the concrete.
George had given us the plans (approved by the county health department) for the septic system he put in 30+ years ago when he moved the house here. The plans showed that the 750-gallon tank was located exactly where the addition is to be built. A few weeks ago, Scott went out with a long metal-rod probe and hit what he thought was the tank right about where the plans said it was. We assumed that was its location.
Well, this week, Scott started digging exploratory holes to see exactly where the tank is in relation to the trenches we need to dig for the foundation. And guess what? The tank is no where to be found. He found the exit pipe and followed it for quite a ways past the house, past the end of where our additon is going, and way past where it shows on the plans. We still don't know where it is. The probe must've hit a rock that Scott mistook for the tank.
This is good news and bad news. Good news: it will be easier for us to dig the new foundation knowing we don't have the old tank to either remove (heaven forbid) or demolish in place after having it pumped out. Bad news: we probably could've revised our plans so we didn't have to spend the extra money to install a new septic system.
Lesson learned: don't trust the plans given you for earlier work you can't see. In our case, what was installed is way different from what shows on the plans. I wish we'd gone looking for the old septic tank before we contacted the engineer to design a whole new system for us. Maybe by posting this, you won't make the same mistake we did.
Thomas and Zilpah Ludlam House (ca. 1790)
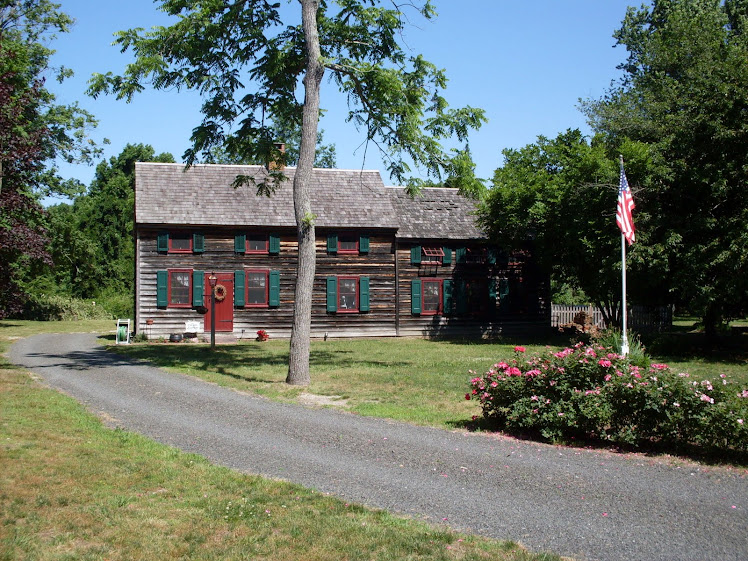
Thomas + Zilpah Ludlam House, ca. 1790
Wednesday, June 29, 2011
Scavenger Hunt, part II
I mentioned in a previous post that we were scavenging historic building materials to use in the addition. I'm a firm believer in the saying that a historic building is a green building because of the investment in labor and natural resources that the already-built house represents. The same goes for building components. Recycling materials is a green option to filling your cart at one of the big box home centers.
We've got historic doors from a ca. 1800 house that we're recycling and they've got their original door locks. Scott, cabinet maker that he is, decided to make a base cabinet for the bathroom sink using heart pine boards that had been submerged for 100 years while standing sentinel for a bridge abutment. A co-worker saved them from the dumpster when the bridge was re-built some 10 years ago and Scott brokered a deal to get a few hundred board feet. A local sawyer (now retired) believes that the planks were sawn from trees that were already 100 years old when placed as part of the bridge 100 years ago. They are knot-free and beautiful, and the cabinet is spectacular! We're putting a copper basin sink on top with copper faucets and the casual look is just what we wanted. I'll post a photo once it's in place.
George left us some beautiful old floor boards of both hard pine and cedar in what is now Scott's workshop. Those will get placed underfoot in the kitchen, but we don't have quite enough so we're looking for some more.
If we can't find any, I may have to make old boards out of new ones. Something you don't know about me is that I'm a painter, trained by my mother who was a professional "Early American decorator." I learned theorem and tole painting from her, but then discovered a passion for realistic oil painting in the style of Philadelphia's well-known Peale family of artists. I'm self-taught in the art of faux painting and I honed my talents restoring our old house. For example, Scott filled the holes in the exposed joists (drilled there for electrical wires) in our living room and I faux-painted knots over the patched holes in the beams to match others. Folks cannot tell which ones are original and which ones are fake.
We're also reusing historic bricks for the foundation and I learned first-hand yesterday what it takes to chip mortar carefully, very carefully, from used bricks. The old lime mortar is fairly easy to remove, but the "newer" stuff with Portland cement takes strength, finess, and a whole lot of patience. I'll leave those for Scott to clean!
George also left us a pile of used, historic bricks that were left-over from building the foundation of the original house when it was moved here in 1975. But, many are broken and I worried that they'd have to be thrown in the dumpster. We spent a few days in Williamsburg last fall and during our meanderings in the historic area, I looked down and noticed I was walking on a sidewalk made largely entirely from broken bricks. Perfect! I took several photos and will be modeling our patio and sidewalk of used bricks following the random patterns I saw there.
![]()
Working with historic buildings professionally as an architectural historian, I've learned that our forefathers and foremothers didn't waste a thing. Houses were moved regularly; in fact, I found a reference dated 1767 that mentioned a house here in Cape May County being moved by a wealthy land owner to a different location. Houses were also recycled for different purposes, too, often becoming barns or shops, and vice versa once their original use was outdated. Similarly, the joists in what is now our kitchen were re-used from a much-earlier house and then recycled in ours around 1830 when the kitchen lean-to was rebuilt.
I like to think that Scott and I are following in the footsteps of those Cape May countians before us who wasted nothing and had no idea they were living the "green movement" a few centuries ahead of time.
We've got historic doors from a ca. 1800 house that we're recycling and they've got their original door locks. Scott, cabinet maker that he is, decided to make a base cabinet for the bathroom sink using heart pine boards that had been submerged for 100 years while standing sentinel for a bridge abutment. A co-worker saved them from the dumpster when the bridge was re-built some 10 years ago and Scott brokered a deal to get a few hundred board feet. A local sawyer (now retired) believes that the planks were sawn from trees that were already 100 years old when placed as part of the bridge 100 years ago. They are knot-free and beautiful, and the cabinet is spectacular! We're putting a copper basin sink on top with copper faucets and the casual look is just what we wanted. I'll post a photo once it's in place.
George left us some beautiful old floor boards of both hard pine and cedar in what is now Scott's workshop. Those will get placed underfoot in the kitchen, but we don't have quite enough so we're looking for some more.
If we can't find any, I may have to make old boards out of new ones. Something you don't know about me is that I'm a painter, trained by my mother who was a professional "Early American decorator." I learned theorem and tole painting from her, but then discovered a passion for realistic oil painting in the style of Philadelphia's well-known Peale family of artists. I'm self-taught in the art of faux painting and I honed my talents restoring our old house. For example, Scott filled the holes in the exposed joists (drilled there for electrical wires) in our living room and I faux-painted knots over the patched holes in the beams to match others. Folks cannot tell which ones are original and which ones are fake.
We're also reusing historic bricks for the foundation and I learned first-hand yesterday what it takes to chip mortar carefully, very carefully, from used bricks. The old lime mortar is fairly easy to remove, but the "newer" stuff with Portland cement takes strength, finess, and a whole lot of patience. I'll leave those for Scott to clean!
George also left us a pile of used, historic bricks that were left-over from building the foundation of the original house when it was moved here in 1975. But, many are broken and I worried that they'd have to be thrown in the dumpster. We spent a few days in Williamsburg last fall and during our meanderings in the historic area, I looked down and noticed I was walking on a sidewalk made largely entirely from broken bricks. Perfect! I took several photos and will be modeling our patio and sidewalk of used bricks following the random patterns I saw there.

Working with historic buildings professionally as an architectural historian, I've learned that our forefathers and foremothers didn't waste a thing. Houses were moved regularly; in fact, I found a reference dated 1767 that mentioned a house here in Cape May County being moved by a wealthy land owner to a different location. Houses were also recycled for different purposes, too, often becoming barns or shops, and vice versa once their original use was outdated. Similarly, the joists in what is now our kitchen were re-used from a much-earlier house and then recycled in ours around 1830 when the kitchen lean-to was rebuilt.
I like to think that Scott and I are following in the footsteps of those Cape May countians before us who wasted nothing and had no idea they were living the "green movement" a few centuries ahead of time.
Thursday, June 23, 2011
The Money Tree
Our house addition officially started last week, with the construction of a new septic system since the existing one is directly under the addition we plan to build.
Day two into the septic project saw the arrival of two dump trucks at 7:30 a.m. that morning. Their job: remove the clay-infused dirt in the septic field then truck in sand to fill the septic pit. I was here the morning they started and watched anxiously as they navigated down our narrow, stone-paved driveway to the back yard where the septic system was being installed. Because our house is perilously close--3'--to the driveway, I was worried that the house might get accidently "nudged" by a passing truck.
The first run went fine, but the second run didn't go as well. One of the drivers, waiting for the other truck to get filled with the septic field dirt, backed down the driveway, got off course, and bent over a 5" diameter red maple tree. The tree didn't break, thankfully, but the root ball was dislodged and the trunk was scraped. I saw it happen and then watched the driver realize, with horror, what he'd done. He pulled away from the tree, but it didn't snap back upright.
I wasn't mad. Honestly, if this is the worst thing that happens during this construction project, I'll be happy. More than happy. The driver felt awful and apologized profusely. It was his first day back after a layoff (I didn't ask for how long because a lot of folks here have been affected by the economic downturn) and he was worried my anger might cost him his job.
I reassured him that I knew it was a mistake and that all I wanted was for him, or his company (a landscape gardening firm) to fix the tree. Someone came out a few hours later and righted the tree. Done deal!
But the driver still felt obligated to "pay" for his mistake. He offered me money, which I promptly refused. An hour later, he tried again, saying he wanted to pay for my next cup of coffee. Again, I reassured him that the damage had been fixed and I wasn't worried about it. He then announced that since I wouldn't take his money, he was going to tie a dollar bill to the tree and it would become our "money tree." It would bring us good luck, and money, during the construction project. I was intrigued, but thought it was all in jest. By golly if he didn't pull the dump truck under the tree, climbed on top of the cab, tied a dollar bill to a branch, and left, wishing us the best.
That was on Tuesday. It's Friday and I still haven't seen any unexpected money. Maybe I should play the lottery, something I don't normally do. Will the money tree live up to its promise? Time will tell and I'll let you know. Old houses are supposed to be money pits, but with our money tree, perhaps we'll buck the trend.
![]()
Day two into the septic project saw the arrival of two dump trucks at 7:30 a.m. that morning. Their job: remove the clay-infused dirt in the septic field then truck in sand to fill the septic pit. I was here the morning they started and watched anxiously as they navigated down our narrow, stone-paved driveway to the back yard where the septic system was being installed. Because our house is perilously close--3'--to the driveway, I was worried that the house might get accidently "nudged" by a passing truck.
The first run went fine, but the second run didn't go as well. One of the drivers, waiting for the other truck to get filled with the septic field dirt, backed down the driveway, got off course, and bent over a 5" diameter red maple tree. The tree didn't break, thankfully, but the root ball was dislodged and the trunk was scraped. I saw it happen and then watched the driver realize, with horror, what he'd done. He pulled away from the tree, but it didn't snap back upright.
I wasn't mad. Honestly, if this is the worst thing that happens during this construction project, I'll be happy. More than happy. The driver felt awful and apologized profusely. It was his first day back after a layoff (I didn't ask for how long because a lot of folks here have been affected by the economic downturn) and he was worried my anger might cost him his job.
I reassured him that I knew it was a mistake and that all I wanted was for him, or his company (a landscape gardening firm) to fix the tree. Someone came out a few hours later and righted the tree. Done deal!
But the driver still felt obligated to "pay" for his mistake. He offered me money, which I promptly refused. An hour later, he tried again, saying he wanted to pay for my next cup of coffee. Again, I reassured him that the damage had been fixed and I wasn't worried about it. He then announced that since I wouldn't take his money, he was going to tie a dollar bill to the tree and it would become our "money tree." It would bring us good luck, and money, during the construction project. I was intrigued, but thought it was all in jest. By golly if he didn't pull the dump truck under the tree, climbed on top of the cab, tied a dollar bill to a branch, and left, wishing us the best.
That was on Tuesday. It's Friday and I still haven't seen any unexpected money. Maybe I should play the lottery, something I don't normally do. Will the money tree live up to its promise? Time will tell and I'll let you know. Old houses are supposed to be money pits, but with our money tree, perhaps we'll buck the trend.

Tuesday, June 21, 2011
Designing the Addition, part II
Having agreed on a footprint (16' wide by 28' deep), Scott and I set about planning the components of the addition. Two friends of ours, who also own historic buildings in Cape May County, had used a timber framing company from Lancaster County, PA (Riehl Construction) to design a timber frame addition for their historic houses. Our ca. 1790 house is built with a timber frame; everything is pegged together, with exposed corner posts in most rooms, and exposed joists overhead in the kitchen.
Riehl Construction has done some phenomenal buildings, from modern houses to barns and everything in between. The cost was considerably less than hiring someone to frame the building, and the look cannot be beat, with exposed beams overhead and exposed corner posts. These exposed framing members are characteristic of most Cape May County houses built before 1830. We have exposed joists in two of our rooms, and corner posts in several, too, so we like the look and it is appropriate for our house. We met with them and quickly decided to have them build a heavy timber frame for our addition. Decisions, decisions. What kind of wood? Oak, heart pine, or something else? (we choose oak) Shouldered corner posts or straight? (we choose straight) Decoration on the joists? (we chose a 3/8" bead)
We didn't want the addition to look exactly like the main house, just inspired by it. Three hundred years from now, we want it to be clear that the addition we built was erected in the early 21st century, not at the end of the 18th century. The original, ca. 1790 house has straight corner posts wrapped in beaded edge boards, so we chose straight ones, not wrapped, for the addition. The original house has cedar posts and joists so we chose oak (if you read my book, you'll learn that in Dennis Township where we live and in neighboring Upper Township the oak was of inferior quality so locally-grown cedar was used). The exposed joists in the oldest part of the house have chamfered edges, so we choose beaded edges.
Below is the smallest bedroom in the original part of the ca. 1790 house; just 6' wide, it has two straight corner posts, both wrapped in beaded edge boards. One of them is seen here behind the bed.
![]()
We also wanted to use true divided-light windows, but with energy-efficient Thermopane glass rather than the single glass we have in the original building. Again, we found a wood window maker in Lancaster County, PA who could make these for us, and the frames as well, at a cost considerably lower than what we priced at Lowe's and Home Depot (and those were full of plastic and vinyl). He's making them from Spanish cedar which is highly resistant to rot. The downside is that we'll have to prime and paint them, but the look cannot be beat, so we both agreed the extra work is worth it.
Other details that will make our addition special have to do with being scavengers. Actually, George (the man we bought our house from) was a scavenger extraordinaire. He took parts from houses that were being torn down in the mid-1970s to build the 16' x 20' addition (living room with master bedroom above) to our historic house. He told me where the winder stairs came from, the wood paneling, the joists overhead, the wide cedar and heart pine floors, the rafters, the doors, and so on. I have it all written down for passing along to the next owner several decades from now.
Also on the property when we bought the house was a former 1-room, ca. 1850 schoolhouse (also moved by George to the lot in the 1970s) that was filled to the rafters with historic building materials, not to mention a lot of junk also, that he had saved for "some day." We found at least 20 doors (paneled and board and batten), part of a late 18th century corner cupboard, a ca. 1810 jelly cupboard (now restored and used for a book case in my home office), weather vanes, antique floor boards, and a whole, whole lot more. Much of this will be used in the addition.
But, we've also played scavenger hunt, too. A friend had rescued three ca. 1800 paneled wood doors from a local house slated for demolition about 10 years ago. They'd been collecting dust in his barn and when we offered to buy them, he was happy to see them go to a good home. Scott loved the fact that they had their original hardware and locks. We've got a place for all three on the first floor.
Below: one of the three doors that will be recycled in the addition. In the right light, you can still see the marks of a hand plane used to smooth the panels.
![]()
George also came over one day, a short, one-board door tucked securely under his arm. Truly, one board about 18" wide. "The door belongs in this house," he declared, as we were patching plaster in the parlor one very hot July day. I don't recall where the door came from, but it's a beauty. It originally went to a closet under a winder stair, and we're going to use it under our stair to the second floor in the addition.
Coming up next: The Money Tree (true story)
Riehl Construction has done some phenomenal buildings, from modern houses to barns and everything in between. The cost was considerably less than hiring someone to frame the building, and the look cannot be beat, with exposed beams overhead and exposed corner posts. These exposed framing members are characteristic of most Cape May County houses built before 1830. We have exposed joists in two of our rooms, and corner posts in several, too, so we like the look and it is appropriate for our house. We met with them and quickly decided to have them build a heavy timber frame for our addition. Decisions, decisions. What kind of wood? Oak, heart pine, or something else? (we choose oak) Shouldered corner posts or straight? (we choose straight) Decoration on the joists? (we chose a 3/8" bead)
We didn't want the addition to look exactly like the main house, just inspired by it. Three hundred years from now, we want it to be clear that the addition we built was erected in the early 21st century, not at the end of the 18th century. The original, ca. 1790 house has straight corner posts wrapped in beaded edge boards, so we chose straight ones, not wrapped, for the addition. The original house has cedar posts and joists so we chose oak (if you read my book, you'll learn that in Dennis Township where we live and in neighboring Upper Township the oak was of inferior quality so locally-grown cedar was used). The exposed joists in the oldest part of the house have chamfered edges, so we choose beaded edges.
Below is the smallest bedroom in the original part of the ca. 1790 house; just 6' wide, it has two straight corner posts, both wrapped in beaded edge boards. One of them is seen here behind the bed.

We also wanted to use true divided-light windows, but with energy-efficient Thermopane glass rather than the single glass we have in the original building. Again, we found a wood window maker in Lancaster County, PA who could make these for us, and the frames as well, at a cost considerably lower than what we priced at Lowe's and Home Depot (and those were full of plastic and vinyl). He's making them from Spanish cedar which is highly resistant to rot. The downside is that we'll have to prime and paint them, but the look cannot be beat, so we both agreed the extra work is worth it.
Other details that will make our addition special have to do with being scavengers. Actually, George (the man we bought our house from) was a scavenger extraordinaire. He took parts from houses that were being torn down in the mid-1970s to build the 16' x 20' addition (living room with master bedroom above) to our historic house. He told me where the winder stairs came from, the wood paneling, the joists overhead, the wide cedar and heart pine floors, the rafters, the doors, and so on. I have it all written down for passing along to the next owner several decades from now.
Also on the property when we bought the house was a former 1-room, ca. 1850 schoolhouse (also moved by George to the lot in the 1970s) that was filled to the rafters with historic building materials, not to mention a lot of junk also, that he had saved for "some day." We found at least 20 doors (paneled and board and batten), part of a late 18th century corner cupboard, a ca. 1810 jelly cupboard (now restored and used for a book case in my home office), weather vanes, antique floor boards, and a whole, whole lot more. Much of this will be used in the addition.
But, we've also played scavenger hunt, too. A friend had rescued three ca. 1800 paneled wood doors from a local house slated for demolition about 10 years ago. They'd been collecting dust in his barn and when we offered to buy them, he was happy to see them go to a good home. Scott loved the fact that they had their original hardware and locks. We've got a place for all three on the first floor.
Below: one of the three doors that will be recycled in the addition. In the right light, you can still see the marks of a hand plane used to smooth the panels.

George also came over one day, a short, one-board door tucked securely under his arm. Truly, one board about 18" wide. "The door belongs in this house," he declared, as we were patching plaster in the parlor one very hot July day. I don't recall where the door came from, but it's a beauty. It originally went to a closet under a winder stair, and we're going to use it under our stair to the second floor in the addition.
Coming up next: The Money Tree (true story)
Tuesday, June 14, 2011
What Design? Plus Septic System Woes...
Having determined that we needed an addition, it was clear from the start that although we knew what spaces were to be created, we couldn't agree on room and addition sizes.
My feeling is that I don't want to build something small only to regret it later. From the start, I envisioned a 1 1/2-story addition with 2 bedrooms (one to be used for storage) on the second floor; the first floor would have a generously-sized kitchen, along with a normal-sized bathroom and laundry room. To get that roomy kitchen, I figured a 16' wide by 30' footprint that gave us a 16' x 15' kitchen was perfect. Plus, with the stair, we could have a coat closet at one end and a pantry at the other tucked under the risers.
My husband disagreed. He thought a 1-story addition, with storage under the rafters and a 16' x 22' footprint was perfect. We'd eliminate the stair, shrink the footprint to just a kitchen, laundry, and full bath. Ever practical, he also thought--rightfully so--that it would cost us considerably less than what I was considering. After much discussion, tinkering with floor plans, and analysing costs, we decided on a 16' x 28' footprint, 1 1/2-stories tall, with the 2 upstairs rooms I'd wanted. The kitchen is 2' shorter than I'd hoped for, but I'm a big believer in compromise.
Scott drew most of the various sketches for the building permit application. Having built custom homes, he knew just what pitch to make the roof, how to frame the walls, floors, and the foundation, what height the stair steps had to be, and so on. I contributed floor plans drawn on the computer with a decades-old (1996) home architecture program that is simple and reliable. I also drew the elevations on the computer using another decades-old drawing program that I still use with my professional work. The plumber, HVAC contractor, and electrician added their plans, too. We submitted everything last week and found out today (a mere 4 days later) that everything was approved! We should have the permit by the end of this week. Cause for celebration!
The good news, though, is always tempered by the bad, and with us it is with the septic system. I mentioned earlier that the ca. 1975 septic system is exactly, precisely where we want to build the addition. So, it must be moved, and in order to do that, we had to hire an engineer to draw the plans to be submitted to the county health department. The bad news started when he came out to dig the test pits, two of them, and found an 8" layer of white clay not far from the bottom of the mandatory 10' deep bed. Mind you, we live at the Jersey shore and the majority of the dirt they dug through was sandy. Clay is not easily permeated by water (read sewage here), so it must all be removed and replaced with sandy soil. The cost to do this was a shock (read almost 20K), but if we want to do the addition, it has to be done. The plans were submitted and we got our septic approval a few weeks ago. And, we had to have that approval before we could submit the plans for the building permit.
Lesson learned here: whatever time you think it will take to get your approvals, double it. We started the septic process at the end of January and weren't approved until 4 months later. Some of this had to do with laggardness on behalf of the engineer while the rest was county bureaucracy. When you're at the mercy of others, you quickly learn that your time frame is not their concern.
They started digging the septic field today and I'm told that tomorrow will be a continuous parade of dump trucks hauling out the "bad" soil and then replacing it with the good.
The layer of white clay is clearly seen near the bottom of the hole.

Up next: More Details, e.g. energy efficient windows for historic building additions, timber framing, scavenger hunt for historic building materials, and more.
Tuesday, June 7, 2011
Why an Addition?
The largest part of our house (16' x 30') was built about 1790. The first floor has a parlor (now my home office) and a kitchen, the latter originally in a 1-story lean-to that was rebuilt about 1840 and raised to match the 1.5-story height of the main block. The second story has two bedrooms, a hallway, and a bathroom. A 16' x 20' addition built in 1975 added a living room with a master bedroom above.
The house--original + addition--had a total of 4 closets when we bought it. Two closets on the first story were quickly given over to other uses...one is now a much-needed half-bath, the other is used for the cats (litter box plus food). The second story has two closets also. One in the bathroom and one in a bedroom, both of which are used as they were intended. Scott added his 'n hers closets to the master bedroom; L-shaped, they enclose the winder stair from the living room. With no coat closet, I comandeered a ca. 1920 cedar-lined wardrobe for that purpose and put it in the smallest bedroom.
I'm sure most fellow old-home-owners can relate to the various storage bins (plastic and cardboard) that are hidden under the three beds behind dust ruffles. I'm glad that antique beds are tall and have lots of space under them!
We do have a very small basement (16' x 10') that gives us a place for the hot water heater, the well pump and water conditioning tanks, and plastic shelving where we can store paint and other items that need to be protected from freezing.
But, it's still not enough. I have my own business and I need a place for overflow books, copies of books I've written, and files in filing cabinets, also the decades of back issues of magazines I own, Early American Life magazine among them. And what about the Christmas decorations, family photos, genealogy files, etc.? We have no attic, so storage is at a real premium. Thank goodness for a storage unit, but the monthly rental cost adds up over time and it is so inconvenient when you want something immediately.
I also have no laundry facilities...correction...I do, but they're in the dingy, snake- and mouse-infested basement (accessed from the outside only) that also has no dryer vent or plumbing for the washer's gray water. George left us a 30-year old stackable washer and dryer, never used, and so deteriorated that the rubber gaskets are barely there. I'm now on a first-name basis with other "regulars" at the local laundromat. The only good thing you can say about using a laundromat is that you're done with a week's worth of dirty clothes in less than 2 hours. The downside is that emergency cleaning has to be done by hand and then air dried.
If all that wasn't enough, we also want to stay in this house as long as possible. We're nearing 60 and thoughts of handicapped-accessible living are a factor in our needs, too. When we can't climb the stairs anymore, we'd like to convert my office into a bedroom (I'll be retired by then anyway) and be able to live on the first floor.
Last but not least, we love to entertain, but our present kitchen is so small that we have to move the antique kitchen table into my office (pushing back all of the furniture in there against the wall) so the table, with drop leaves open, can seat 8. Hardly ideal, but it works for now.

With all of these concerns, it was obvious that an addition was the solution.
NEXT: It's all in the design: what size (we didn't agree); what lay-out and floor plan (we agreed), plus septic system woes.
Thursday, June 2, 2011
A Bit of Background: How This Historic House Became Ours
I'm an architectural historian so I work with historic buildings every day. I'm blessed to absolutely love what I do for a living. I first saw this house--the one my husband and I now live in-- about 10 years ago, when I was doing a survey of the earliest buildings in Cape May County. I'm not talking about the Victorians in Cape May City; every one knows about them. I'm talking about the houses that date to the late 1600s and early 1700s, built when the county was first settled by New Englanders; no one knew about them until I published my book about them (but that's another story).
The Ludlam House was vacant, and I learned that the man who owned it, George, lived in the much bigger ca. 1806 historic house next door. I pulled into the driveway, unannounced, and knocked on his door one day. After explaining my professional interest in his two historic houses, he welcomed me in and we became friends, our shared love for old buildings giving us an instant rapport. He hired me to put the "little house" on the National Register of Historic Places, my study ended, I published my book (yes, this house is in it) and I moved on to other projects. But, I couldn't get the little gem, as I came to call it, out of my mind.
It was built about 1790 and is standing at its third known location. George, an antiques dealer, moved it here in the 1970s, restored the exterior, installed new plumbing and wiring, insulated it, and built a somewhat shorter addition using recycled parts of historic buildings about to be demolished. Just as he was ready to restore the interior his wife passed away unexpectedly. A few years went by and he eventually remarried, but his new wife fell in love with the much, much larger historic house next door. They bought that one and used this one as a warehouse for his antiques. It was always his dream to someday restore the interior, but days, months, years passed until my husband, Scott, and I approached him in 2007 with an interest to buy it and restore it. My youngest had just left for college and we were ready to take on a new challenge. George was nearing 90 and was finally accepting that he probably wouldn't ever finish the house's interior, so on a handshake (literally) we struck a deal and the house was ours.
It took us almost two years to restore the building. Decades of neglect mandated a new cedar roof and a total repainting of the exterior trim. Shutters George had collected, but never used, were restored, painted, and hung on appropriate hardware. Windows were reglazed and repainted. Window sills had large areas of rot which were filled with epoxy and repainted also.
I'm a lucky woman. My husband, Scott, was a custom house builder (he always liked the look of historic buildings but had never restored one before) who turned to bridge building in the early 1980s when the housing market took a nose dive. I only knew him as a bridge builder, so his talents as a restorer of old houses were a question mark to me until we bought this house. Turns out he's a meticulous carpenter with talent galore for fixing anything. Sure, we butted heads a few times, particularly when he wanted to use new, inappropriate ways to do something (like use spray-on insulation under the crawl space) but once he understood that whatever we did had to be reversible, we proved to be the perfect restoration team.
The interior had not been touched since the 1930s. Honest. The house hadn't been lived in since then so we found a well-preserved (but much painted) interior that retained all of its ca. 1790 details--fireplace mantel, handrailings, board and batten doors, wood wainscott, random-width floor boards that had never been varnished, plaster walls in bad shape, and all original trim--just waiting to be restored. Using soy-based stripper, gallons of paint and varnish, countless hours of elbow grease, a dozen boxes of latex gloves, and several buckets of plaster repair material, we finished restoring the interior just as our other house sold. What timing! (And in the worst real estate market in decades). The house was meant to be ours. We moved in and have been here almost two years now.
Last year, we received an award from the New Jersey State Historic Preservation Office for the high quality of our restoration. George came to the ceremony, oxygen tank and all, and was honored for his part, too, in having the vision to save it. He died a few months ago, a dear neighbor and friend whose historic house we cherish. We love it here, but.......
Next--why an addition? (Think no storage, two years of going to the laundromat are two years too many, tiny kitchen, etc.)
Subscribe to:
Posts (Atom)