Thomas and Zilpah Ludlam House (ca. 1790)

Thomas and Zilpah Ludlam House (ca. 1790)
Thomas + Zilpah Ludlam House, ca. 1790

Saturday, August 13, 2011

Framing and Reclaimed Flooring

While Scotty and Jamie finish the roof, Scott (with some help from our friend, Al) has been framing the addition.  We're talking a lot of 2x4 studs and plywood sheathing here.  Incredibly, the addition--with door and window openings now--is really starting to look like something and we've only had the timber frame up for 3 weeks now.  Until we have the windows in place, we're keeping the side walls covered with tarps.  The windows (double-hung wood sash with true divided lights and thermo-pane glass) are here and I started the prep work on them today, filling screw holes with PC Woody. 

We are HUGE fans of PC Woody, a 2-part epoxy that is phenomenal when it comes to filling holes in wood.  It sands easily and now comes with colorants if you want to match a particular wood.  The windows are made of Spanish cedar and I'll be priming them with an oil-based primer.  A painter friend of ours swears by a latex primer, but I'm wary.  I'd rather use an oil-based primer (under a latex paint) that I know from personal experience works, than try something new and be unhappy with it a few years from now.


Scott scored a great find this week with just enough reclaimed, antique hard pine flooring to do our kitchen.  These boards are beautiful...up to 14" wide, unpainted on one side, but very very dirty.  I know all about scrubbing boards, so I'm not intimidated.  I'm anxious to see if the boards are pumpkin pine like we have in the main house.  There are some flaws, damaged areas, dings, etc., but we'll use PC Woody where needed.  Below is the pile that Scott has "stickered" to air out.

The reclaimed wood floor boards.  The opening in the stud wall to the left is for a bay window.

The Wonders of White Nail Polish

This post doesn't really relate to building our addition, but it is germane to any old house owner whose white bath tub isn't quite up to snuff.  Ours is about 35 years old and wasn't used much until we moved in two years ago.  But somewhere along the way it got a 3/8" chip right by the drain.  A 3/8" chip doesn't warrant an entire bathtub resurfacing in my opinion when the rest of the tub looks good.

The first time I tried to fix the chip I went to the hardware store and bought the porcelain-repair epoxy stuff.  I mixed it up per directions, put it on in two coats, let it dry thoroughly between coats, and admired my handiwork a few hours later.  The fix only lasted about 2 weeks...I started seeing rust stains under the white coating and then the whole patch fell off.  Well, I thought maybe I hadn't sanded and cleaned the area thoroughly enough, so I went back, spent another $6 and tried it again.  Looked good again.  Two weeks later, same deal.  So, I got to thinking what else could I use?  Then it occurred to me that white nail polish just might be the answer.  And if it didn't work, I could remove it easily with nail polish remover.  I'm a big fan of easily-reversible fixes.

So, I went to CVS, bought one that was about the same slightly-off-white shade as our 35-year old tub and tried two coats.  Four weeks later, it still looks great.  The plastic bumper on my white Prius has a few dings that need some cosmetics, so I'm going use it there next.

The patch is located at about 1 o'clock.

Sunday, August 7, 2011

cedar roof and a Rainhandler gutter

8-7-2011:
For the past week and one-half, Scott's son, Scotty, and our friend J.P. (Jamie) Hand have been putting on the new cedar shingle roof over the addition.  The main block has a cedar roof and we felt that the addition should have one, too.  We got our Canadian cedar shingles from a supplier in Lancaster County, PA and also the copper-coated lead for the valley flashing.  The valley flashing is very, very expensive, so we asked around for alteratives; someone mentioned terne-coated steel, while someone else thought they'd heard of a new-to-the-market plastic-based flashing.  In the end, we decided that we didn't want to skimp on the roof since the roof protects everything under it!!  So, we went with the copper-coated lead.  The guys used a wood mallet to bend the edges of the flashing and found that the old-fashioned, hand-held break worked better than the new one!


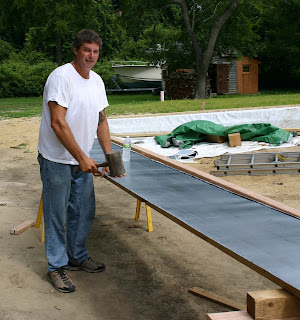
Scott walks past the addition while J.P. Hand (to the left) and Scotty (on the right) work on the scaffold as they start to lay the cedar shingle roof.

Scotty uses a wooden mallet to flatten the edges of the valley flashing.

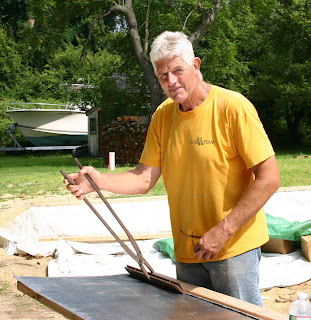
Scott Sr. holds the old-fashioned break that he used to turn the edges on the valley flashing.  He also used it to bend the flashing in the middle to sit properly in the valleys.

The guys will be done with the roof in another day or so.  I should mention that Jamie is really good at laying a cedar shake roof; he's very particular about the shingles and will reject those in the bundle that are "boxy" (curled) or are otherwise imperfect.  He also staggers them properly and does the right overhang.

The Rainhandler gutter was something we finally in ordered in June and Scott put it up a few weeks ago on the front elevation of the main block.  In case you're not familiar with it, it's a fairly new gutter system that broadcasts the rain away from the building using a series of staggered, slanted aluminum strips that attach to the fascia board.  They used to advertise in Old House Journal, but I found them doing a google search.   http://www.rainhandler.com/ We ordered the brown color and before ordering consulted their very well-written directions on-line.  We determined we needed to buy spacers as well so the rain would hit the strips just right.  It took Scott a few hours to install them and we couldn't be happier.  They shipped quickly and were packaged safely for the trip.  They look great!  You really have to look closely to see them, and since we're 100' off the road, I'm sure most folks don't even notice them.  I think they're prefect for historic buildings, the facade (front elevation) at least.  We have some drainage issues in the back of the house (thanks to the new septic system), so we're going with traditional gutters back there.


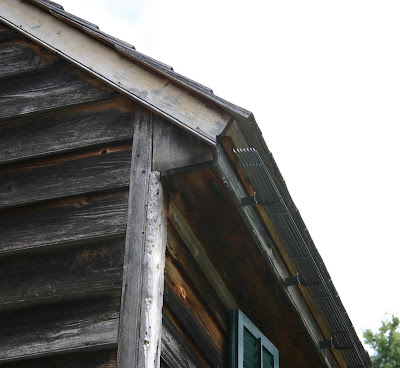
The Rainhandler gutter as installed on the front of the house.

Money tree update:  I'm up to three free donuts at Acme.  At least they're tasty.....